
Elementor Container vs Section – Kaunsa Better Hai for Beginners?
Agar aap recently Elementor use karna start kiya hai, toh aapne “Section”, “Column”, aur “Container” terms zarur dekhi hongi.
Bahut beginners confuse ho jate hain ki:
Section kya hota hai?
Container kya hota hai?
Kaunsa use karna better hai?
Old method aur new method me difference kya ha
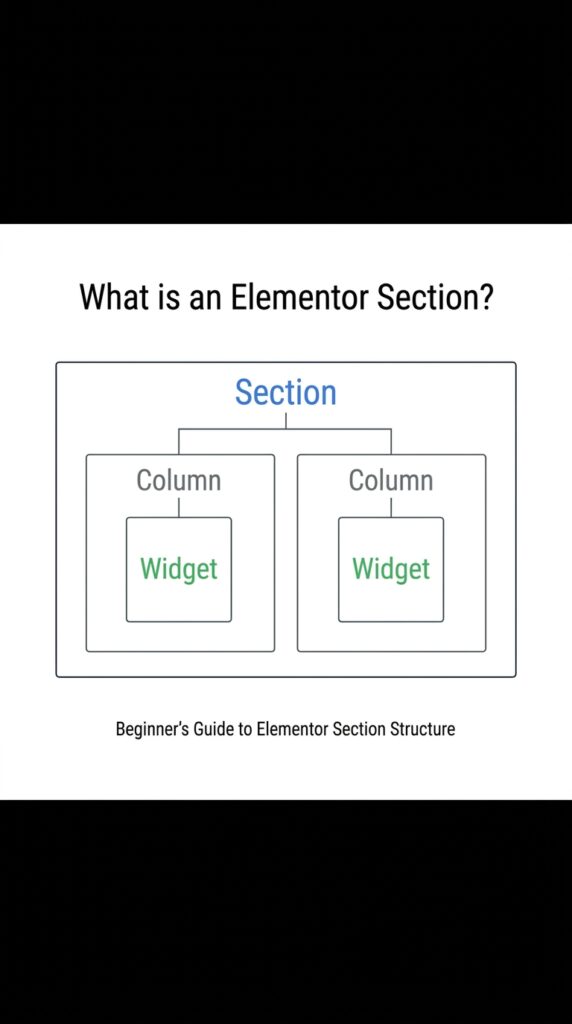
Elementor Section Kya Hota Hai?
Old Elementor layout system me website design karne ke liye:
Section
Columns
Widgets use hote the.
Structure kuch aisa hota tha:
Section
├── Column
│ └── Widget
└── Column
└── Widget
Matlab pehle section add karo, fir uske andar columns banao, aur fir widgets add karo.
Example
Agar aap 2-column layout banana chahte ho:
Left side → Text
Right side → Image
Toh aapko:
1. Section add karni padti thi
2. 2 columns choose karne padte the
3. Widgets drag karne padte the
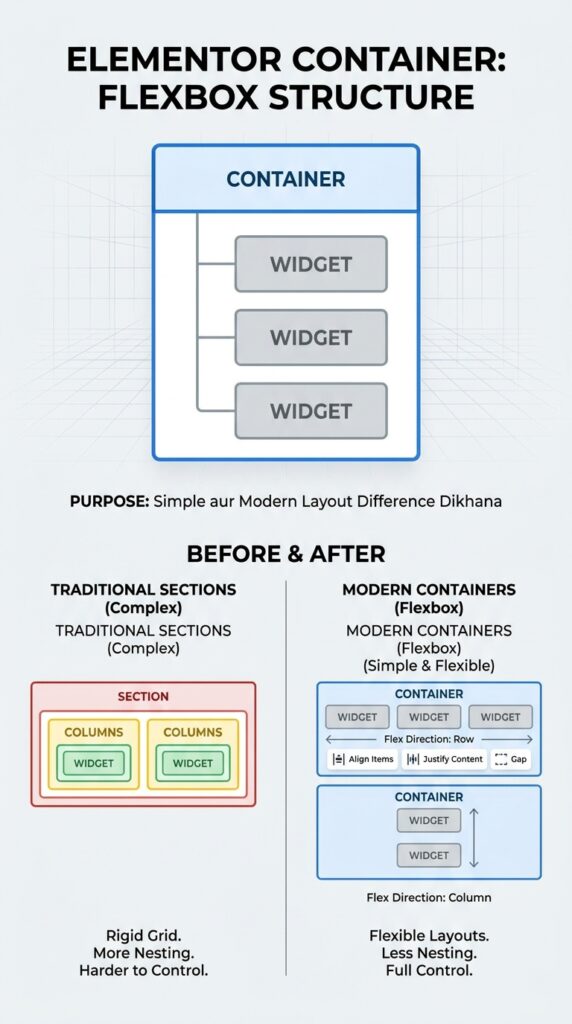
Elementor Container Kya Hota Hai?
Container Elementor ka new modern layout system hai.
Ye Flexbox technology par based hota hai aur zyada flexible hota hai.
Structure simple ho gaya:
Container
└── Widgets
Ya nested containers bhi ho sakte hain.
Simple Meaning
Container me aap directly:
Text
Image
Button
Icon
Anything
add kar sakte ho without unnecessary columns.
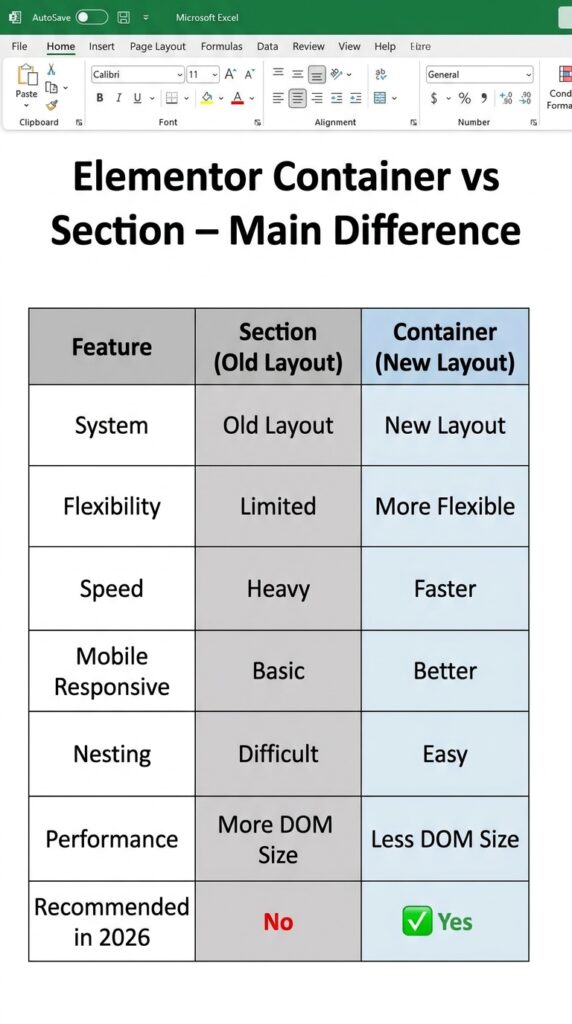
Elementor Container vs Section – Main Difference
Beginners Ko Container Kyu Use Karna Chahiye?
1. Website Faster Hoti Hai
Container cleaner code generate karta hai.
Isse:
Page lightweight hota hai
Loading speed improve hoti hai
SEO better ho sakta hai
2. Mobile Responsive Banana Easy Hai
Container me:
Direction change
Alignment
Gap
Width
easily control kar sakte ho.
3. Modern Website Design Easy Ho Jata Hai
Aajkal mostly professional websites:
Flex layouts
Modern spacing
Responsive design use karti hain.
Container ye sab easy bana deta hai.
Elementor Section Use Karna Chahiye Ya Container?
Agar aap beginner ho aur abhi learning start kar rahe ho, toh:
✅ Container seekho
✅ Container use karo
✅ Future projects me container-based websites banao
Kyuki Elementor officially bhi containers ko promote kar raha hai.
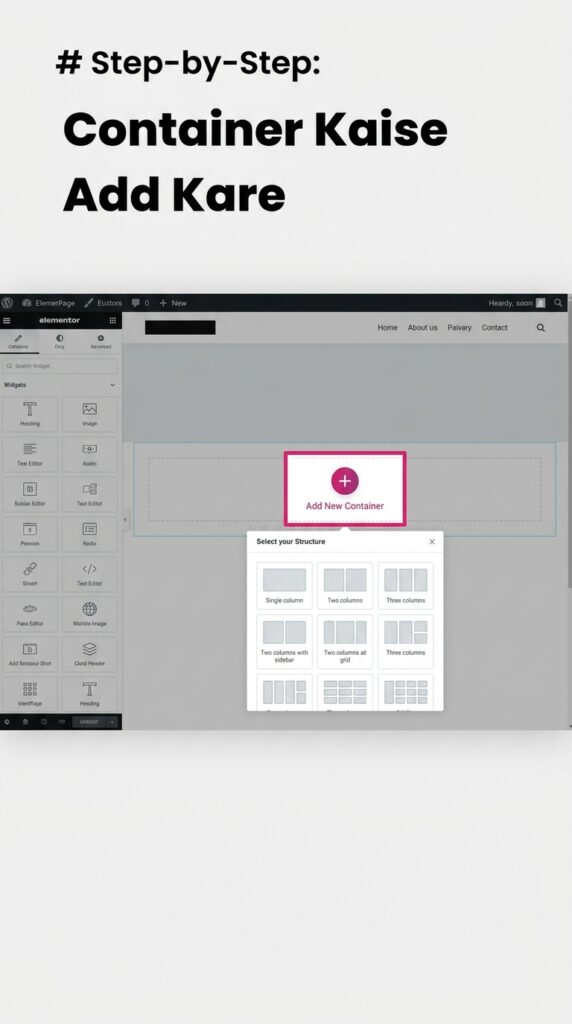
Step-by-Step: Container Kaise Add Kare in Elementor
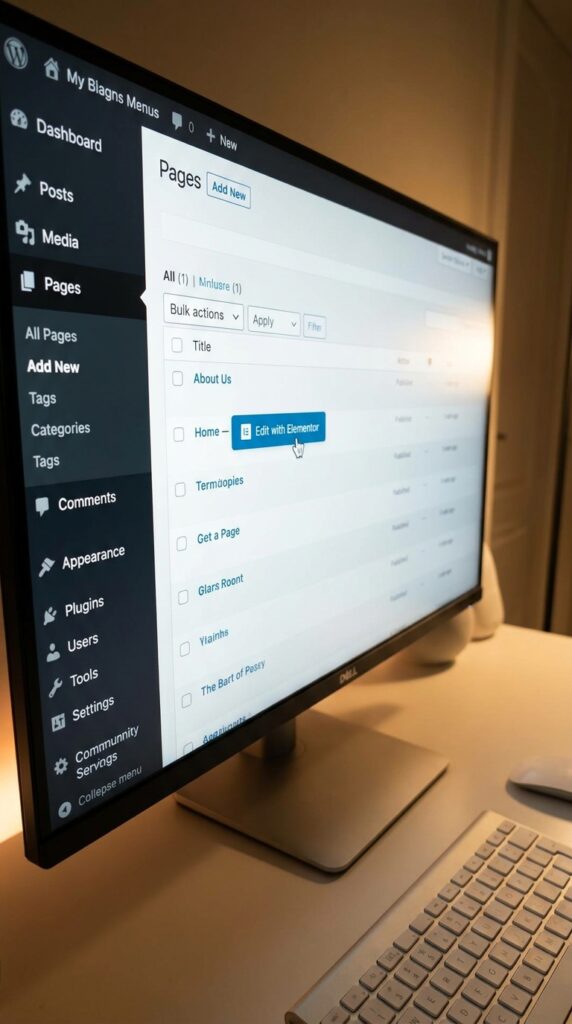
Step 1 – Edit with Elementor
WordPress dashboard me:
Pages
Edit with Elementor open karo.
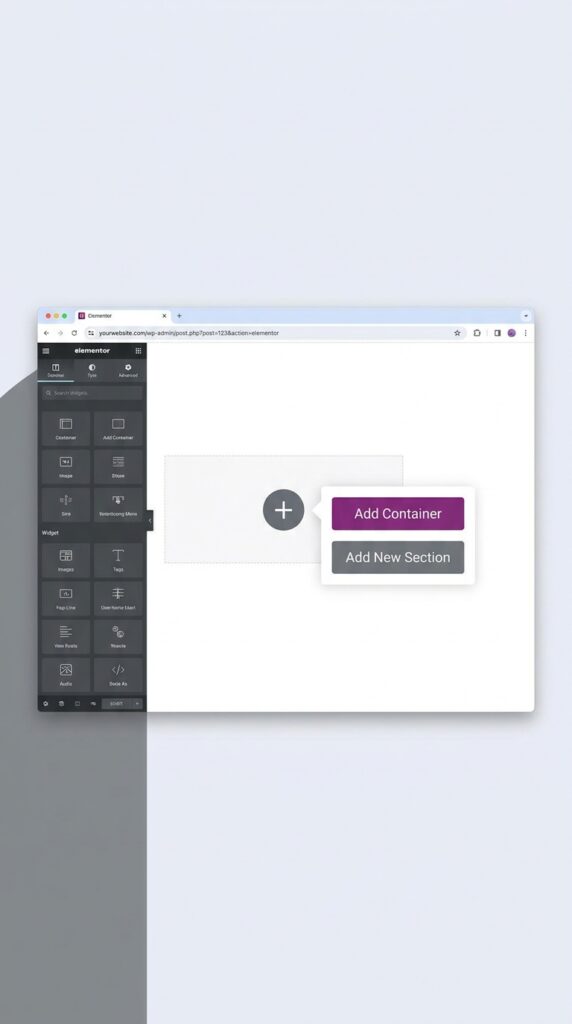
Step 2 – Plus Icon Par Click Karo
Ab Elementor editor open hoga.
Yahan:
“Add Container” option dikhega.
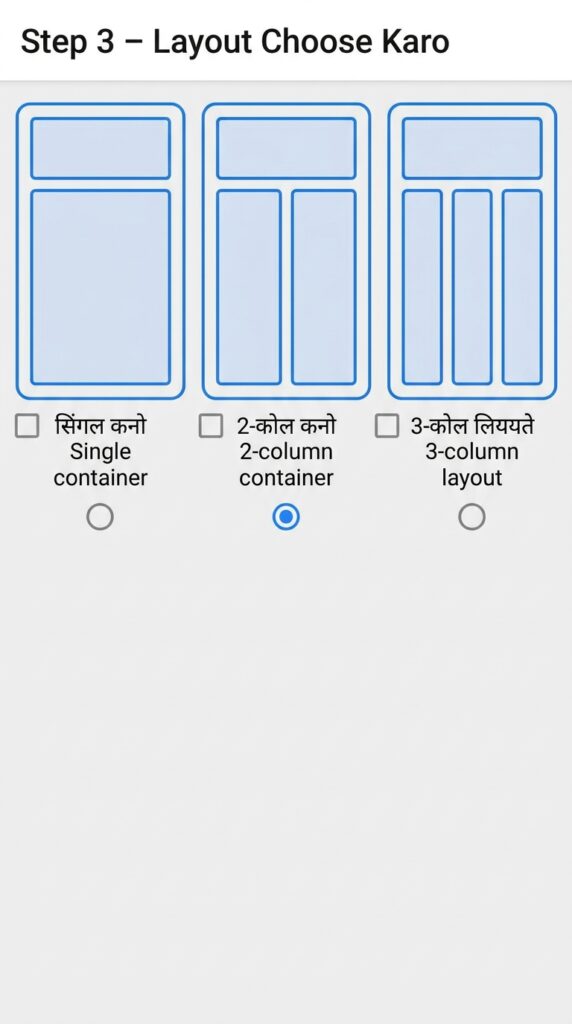
Step 3 – Layout Choose Karo
Aap choose kar sakte ho:
Single container
2-column container
3-column layout
Step 4 – Widgets Drag and Drop Karo
Ab container ke andar:
Heading
Text
Image
Button drag karo.
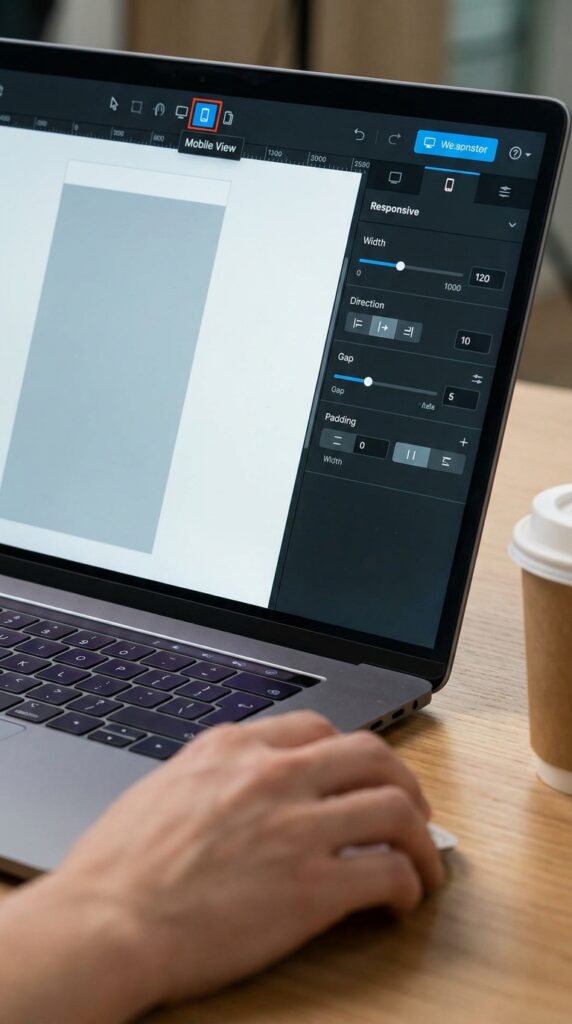
Step 5 – Responsive Settings Adjust Karo
Mobile icon par click karke:
Width
Direction
Gap
Padding
mobile ke according adjust karo.
Real Example
Agar aap Hero Section banana chahte ho:
Left Side
Heading
Paragraph
Button
Right Side
Image
Toh aap simply:
1 parent container
→ uske andar 2 inner containers
use kar sakte ho.
Ye clean aur professional method hai.
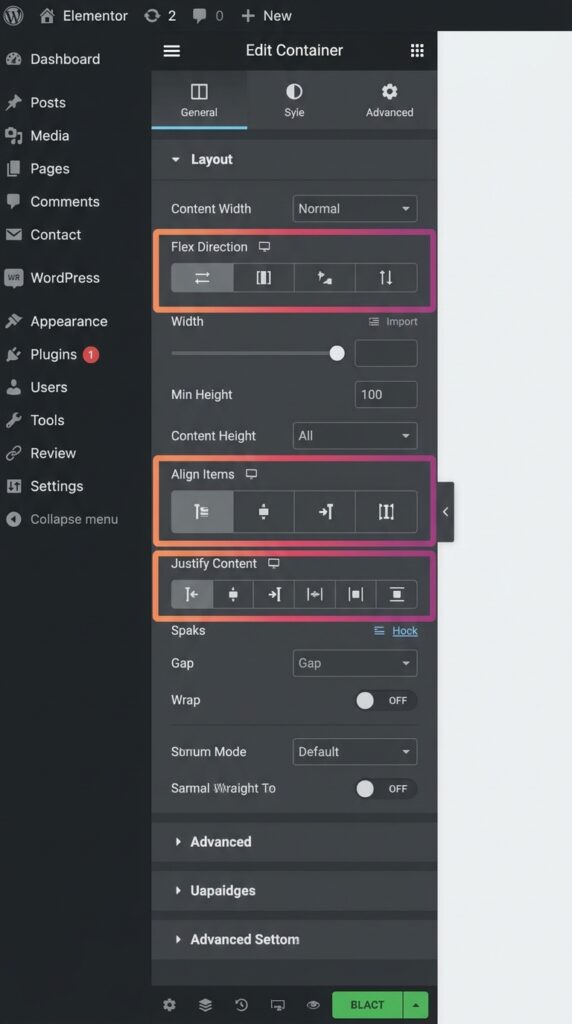
Container Ke Important Settings
Direction
Controls layout direction:
Row = side by side
Column = top to bottom
Justify Content
Content ko horizontally align karta hai.
Example:
Center
Space-between
Start
End
Align Items
Vertical alignment control karta hai.
Gap
Widgets ke beech spacing deta hai.
Common Beginner Mistakes
1. Extra Containers Banana
Har small item ke liye unnecessary containers mat banao.
2. Padding Aur Margin Confuse Karna
Padding = andar ki spacing
Margin = bahar ki spacing
3. Mobile View Check Na Karna
Hamesha:
Desktop
Tablet
Mobile
teeno views check karo.
Container vs Section – Final Verdict
Agar aap 2026 me Elementor seekh rahe ho, toh:
✅ Container best option hai
✅ Faster websites banengi
✅ Responsive design easy hoga
✅ Modern layouts create kar paoge
✅ Clients ko professional work deliver kar paoge
Section system old hai, lekin containers future hain.
Final Tips for Beginners
Daily Elementor practice karo
Simple layouts recreate karo
Container direction samjho
Responsive settings par focus karo
Real websites observe karo
Jitna zyada practice karoge, utni fast improvement hogi.